This teaches you how to run a Gaia storage hub on DigitalOcean (DO). DigitalOcean is an affordable and convenient cloud computing provider. This example uses DigitalOcean Spaces for file storage. A space is equivalent to AWS’s S3 file storage solution.
DigitalOcean provides you with a compute machines known as a Droplets and storage called a Spaces. You need both to run a Gaia hub. The Gaia hub setup you create here, requires get a Digital Droplet with Docker pre-installed and a 250 GB Space. Droplets and storage each run for $5/month or a total of $10/month.
- Prerequisites you need
- Task 1: Create a DigitalOcean space
- Task 2: Enable File Listing and Set a Bucket Policy
- Task 3: Create a DigitalOcean droplet
- Task 4: Open a console on your Droplet
- Task 5: Create a space key
- Task 6: Get the Gaia code and configure your server
- Task 7: Run the Gaia image with Docker
- Task 8: Set up an Nginx reverse proxy
- Task 9: Test your Gaia server
- Task 10: Configure a domain name
- Task 11: Set up SSL
Is this tutorial for you?
This documentation is appropriate for advanced power users who are familiar with command line tools, editing configuration files, and basic configuration of services of DNS or Nginx.
If you are planning on running an open-membership hub or an application-specific hub, you'll should see the section on Hub Operation
.Prerequisites you need
You use DigitalOcean choose and configure assets for running droplets and spaces. To enable this, you must be sure to complete the prerequisites in this section.
You must create an account on DigitalOcean. DigitalOcean requires you to supply a credit card to create an account. You are only charged for the services you use the Gaia hub as of this writing should cost $10 USD a month.
The easiest way to interact with your droplet is the DigitalOcean Console. Users who are comfortable using the secure shell (SSH) and private keys may prefer to open a local terminal on their home machine instead. To enable this, you should ensure you have the following prerequisites completed.
-
Locate an existing SSH key pair on your Mac or create a new SSH key pair. Your key should have a passphrase, do not use a key pair without one.
-
Create a personal access token in DigitalOcean.
-
Install
doctlwhich is the DigitalOcean command line tool. For information on installing these, see which is the DigitalOcean command line utility. Check out their installation instructions to see how to install it on your computer.
Task 1: Create a DigitalOcean space
In this task you create a Space which is where Gaia stores your files.
-
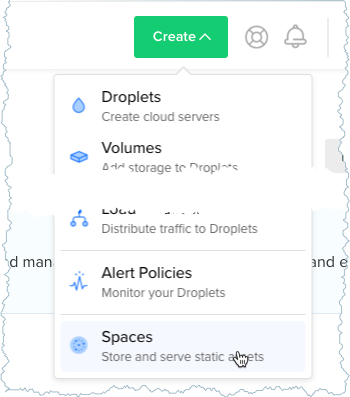
Choose Create > Spaces from the dashboard menu.
-
Choose a datacenter region section.
Important: Choose a region that is both geographically close to you and that supports spaces. Currently, San Francisco, New York, Amsterdam, and Singapore support spaces.The geographical location of your server impacts latency for storing data. You select a region close to you so that when you use Blockstack apps, storing data is quicker.
-
Scroll down to Finalize and Create.
-
Choose a unique name.
This name is used when reading files that you’ve stored through Gaia. You’ll need to remember this name when you set up your Gaia server later on.
-
Click Create a Space.
After a moment, your Space is up and running.
Task 2: Enable File Listing and Set a Bucket Policy
On Digital Ocean, set Enable File Listing:
-
Navigate to the Spaces tab.
- Select your newly created space and click Settings
- Set Enable File Listing for your space.
- Press Save.
On your local workstation, create a bucket policy to grant read permission on your space.
- On your local workstation, open a terminal.
- Install and configure the s3cmd.
-
In the current directory, use the
touchcommand to create a file calledgaiahub-policy.touch gaiahub-policy - Use your favorite editor to open the file.
-
Add the following policy to the file.
{ "Version":"2012-10-17", "Id": "read policy", "Statement":[ { "Sid":"PublicRead", "Effect":"Allow", "Principal": "*", "Action": "s3:GetObject", "Resource": "arn:aws:s3:::<SPACE_NAME>/*" } ] } -
Edit the
Resourceline and replace the<SPACE_NAME>with your space name from Digital Ocean.For example, if your space is named
meepers, after editing the line you would have:"Resource": "arn:aws:s3:::meepers/*"Be sure not to change any of the other fields, especially
Version. - Save and close the file.
-
Use
s3cmdto enact the policy.s3cmd setpolicy gaiahub-policy s3://<SPACE_NAME>Be sure to
SPACE_NAMEwith the name of your space, for example:s3cmd setpolicy gaiahub-policy s3://meepers
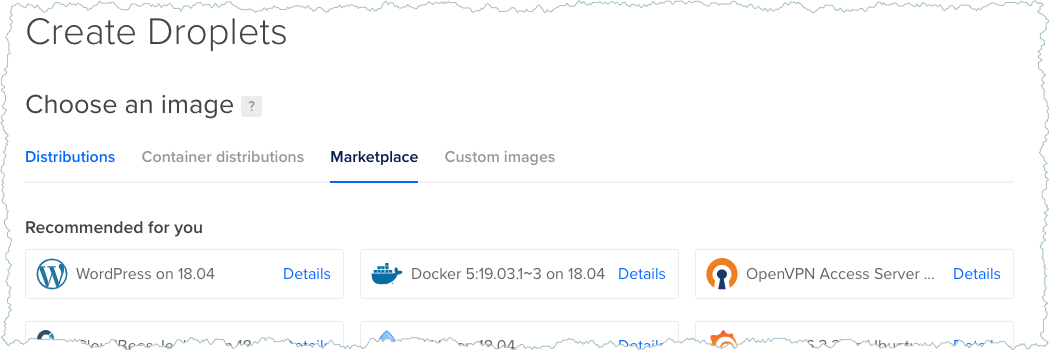
Task 3: Create a DigitalOcean droplet
In this task, you add a droplet to your account. The droplet is a droplet is a cloud-based server you can use as a compute resource. This server is where you will run the Gaia Storage System service. The droplet you create will be an Ubuntu server with Docker pre-installed.
- Log into DigitalOcean.
-
Go to your DigitalOcean dashboard.
-
Click the Create > Droplets button in the top right.

-
Select the Marketplace tab.
-
Select the Docker app from the options presented.
-
Scroll down to the Choose a size section and use the left arrow to display and select the $5/mo image.
This size gives you plenty of memory and disk space to run a personal hub.
-
Scroll down to the Choose a datacenter region section.
Important: Choose a region that is both geographically close to you and that supports spaces. Currently, San Francisco, New York, Amsterdam, and Singapore support spaces.The geographical location of your server impacts latency for storing data. You select a region close to you so that when you use Blockstack apps, storing data is quicker.
-
If you are using SSH, scroll to the Add your SSH key section and choose an SSH key to use. Otherwise,
-
Scroll down to the Finalize and create section.
-
Choose a hostname for your droplet such as
moxie-gaiahub. - Review your choices then click Create to start your droplet running.
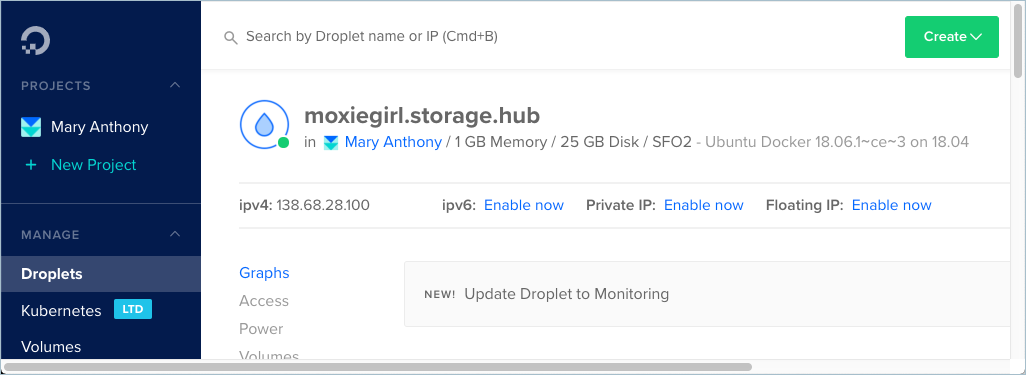
At this point, your new droplet should appear in the list of resources on your DigitalOcean dashboard.
Task 4: Open a console on your Droplet
A droplet console emulates the access you would have if you were sitting down with a keyboard and monitor attached to the actual server. In this section, you open a console on your droplet.
-
From the DigitalOcean dashboard, select Droplets.
You should see the droplet you just created.
-
Click on the droplet name to open the control panel.
- Choose Access from the control panel.
-
Select Reset Root Password to have DigitalOcean send you the root password.
DigitalOcean sends a temporary password to the email attached to your account. It takes a couple of minutes to reset the root password on your droplet.
- Open your email and copy the password.
-
Switch back to the droplet control panel and choose Launch Console.
A new window with the console appears.
- Enter
rootfor the login. -
Paste the password copied from your email.
The system displays a message telling you to change the
rootpassword.And prompts you for the current password.
-
Past the password copied from your email again.
The system prompts you for a new password and ask you to enter it again.
-
Provide and confirm a new password.
The system logins you in and gives you a welcome message. At the conclusion of the message, you are at the console prompt.
Welcome to DigitalOcean's One-Click Docker Droplet.
To keep this Droplet secure, the UFW firewall is enabled.
All ports are BLOCKED except 22 (SSH), 2375 (Docker) and 2376 (Docker).
*	The Docker One-Click Quickstart guide is available at:
https ://do.co/docker1804#start
*	You can SSH to this Droplet in a terminal as root: ssh root@138.68.28.100
*	Docker is installed and configured per Docker's recommendations:
https://docs.docker.com/install/linux/docker-ce/ubuntu/
*	Docker Compose is installed and configured per Docker's recommendations:
https://docs.docker.eom/compose/install/#install-compose
For help and more information, visit http://do.co/dockerl804

To delete this message of the day: rm -rf /etc/update-motd.d/99-one-click
root@meepers:~#
Useful tips for the console
If you run into problems using the console, see the notes on this page in the DigitalOcean documentation.
If you find the output from ls difficult to read, try enter the following to change the console colors from the command line: LS_COLORS="di=1;31" You can also edit your console .bashrc. file permanently, of course.
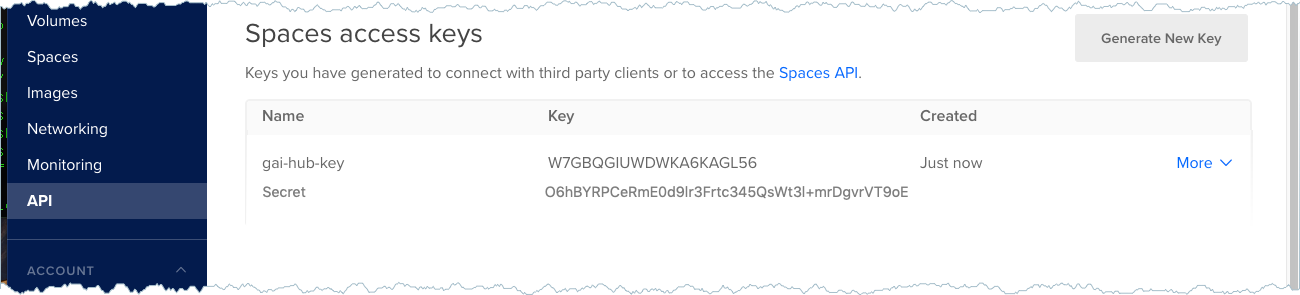
Task 5: Create a space key
- In the DigitalOcean dashboard, go to the API page.
- Scroll to the Spaces Access Keys section.
-
Click Generate New Key.
The system prompts you to give the key a name.
-
Enter a name for the key.
It is helpful to choose descriptive name like
gai-hub-key. -
Press the check mark.
The system creates your key and displays both the key and its secret.
-
Save your secret in a secure password manager.
You should never share your secret.
- Leave the page up with your key and secret and go to your open console.
Task 6: Get the Gaia code and configure your server
You should have the console open as root on your Droplet. In this section, you get the Gaia code and configure the Gaia service.
-
Copy the Gaia code into your droplet using the
git clonecommand.root@meepers:~# git clone https://github.com/blockstack/gaia.gitSuccessful output from this command looks like the following.
Cloning into 'gaia'...
remote: Enumerating objects: 63, done.
remote: Counting objects: 100% (63/63), done.
remote: Compressing objects: 100% (46/46), done.
remote: Total 4206 (delta 27), reused 35 (delta 17), pack-reused 4143
Receiving objects: 100% (4206/4206), 17.40 MiB | 9.89 MiB/s, done.
Resolving deltas: 100% (2700/2700), done.
root@meepers:~#
This command creates a
gaiasubdirectory. -
Change to
hubdirectory in thegaiacode.cd gaia/hub -
Copy the configuration sample to a new
config.jsonfile.cp config.do.sample.json config.json -
Edit your new
config.jsonfile withviorvim.vi config.jsonYou now need to edit this JSON file to have it store files on your DigitalOcean space.
{
 "serverName": "DROPLET_NAME",
 "port": 4000,
 "driver": "aws",
 "readURL": "SPACE_URL",
 "proofsConfig": {
   "proofsRequired": 0
 },
 "pageSize": 20,
 "bucket": "SPACE_NAME",
 "awsCredentials": {
    "endpoint": "SPACE_LOCATION",
    "accessKeyId": "YOUR_ACCESS_KEY",
    "secretAccessKey": ""
 },
 "argsTransport": {
   "level": "debug",
   "handleExceptions": true,
   "stringify": true,
   "timestamp": true,
   "colorize": false,
   "json": true
 }
  }
You’ll find that the
driveris set toaws. The DigitalOcean space API exactly mimics the S3 API. Since Gaia doesn’t have a DigitalOcean driver, you can just use theawsdriver with some special configuration. - Set the
serverNameto the droplet you just created. -
Set the
readURLto the URL of the DigitalOcean space you just created.If your space URL called
https://meepers-hub-space.sfo2.digitaloceanspaces.com, thereadURLname ishttps://meepers-hub-space.sfo2.digitaloceanspaces.com. -
Set the
bucketto the name of the DigitalOcean space you just created.If your space is called
meepers-hub-space, thebucketvalue ismeepers-hub-space. - Go back to your DigitalOcean dashboard open to your space key.
- Copy the Key and paste it into the
accessKeyIdvalue in theconfig.jsonfile. - Copy the Secret and paste it into the
secretAccessKeyvalue in theconfig.jsonfile. - In the DigitalOcean dashboard, choose the Spaces page.
-
Copy the section of your space URL that follows the name.
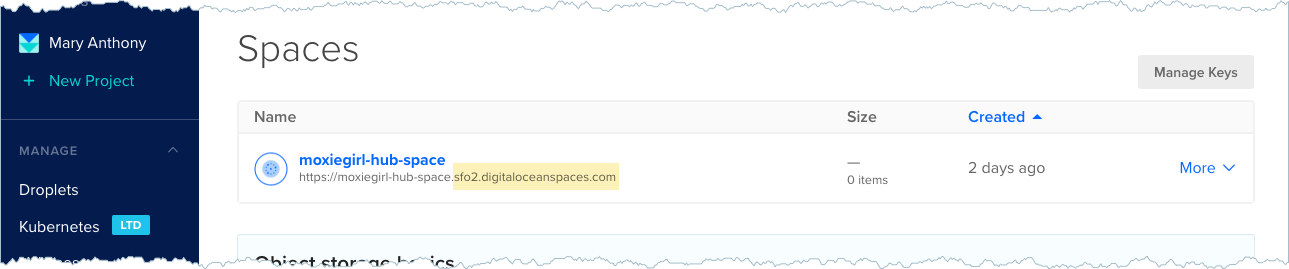
In this example, you would copy the
sfo2.digitaloceanspaces.comsection. -
Paste the string you copied into the
endpointvalue. -
Ensure the
proofsRequiredvalue is set to the number0(zero).This will allow Blockstack user to write to your Gaia hub, without any social proofs required. You can change this later on, and do other things to lock-down this Gaia hub to just yourself, but that is outside the scope of this document.
At this point, the
json.configfile should be completed and appear similar to the following &—; but with your values.{ "serverName": "moxie-gaiahub", "port": 4000, "driver": "aws", "readURL": "https://meepers-hub-space.sfo2.digitaloceanspaces.com", "proofsConfig": { "proofsRequired": 0 }, "pageSize": 20, "bucket": "meepers-hub-space", "awsCredentials": { "endpoint": "sfo2.digitaloceanspaces.com", "accessKeyId": "fb3J7AT/PGMGMPOA86EFLpx8IjGZQib99eXWjVR+QK0", "secretAccessKey": "9ac685342eaa5bc4b44c13f3ecf43b001a3bdb9e2257114d44394d410dd91f66" }, "argsTransport": { "level": "debug", "handleExceptions": true, "stringify": true, "timestamp": true, "colorize": false, "json": true } } -
Save your config file and close the
vimeditor.The system returns you back to the prompt.
Task 7: Run the Gaia image with Docker
While your console is still in the the gaia/hub folder, build the gaia.hub image.
-
Enter the following
dockercommand at the console command line.docker build -t gaia.hub .This build users the
Dockerfilealready in thegaia/hubfolder. The output of the command is similar to the following:.... npm WARN gaia-hub@2.3.4 No license field. npm WARN optional SKIPPING OPTIONAL DEPENDENCY: fsevents@1.2.4 (node_modules/fsevents): npm WARN notsup SKIPPING OPTIONAL DEPENDENCY: Unsupported platform for fsevents@1.2.4: wanted {"os":"darwin","arch":"any"} (current: {"os":"linux","arch":"x64"}) added 877 packages from 540 contributors and audited 3671 packages in 38.122s found 0 vulnerabilities Removing intermediate container b0aef024879f ---> 5fd126019708 Step 5/5 : CMD ["npm", "run", "start"] ---> Running in ae459cc0865b Removing intermediate container ae459cc0865b ---> b1ced6c39784 Successfully built b1ced6c39784 Successfully tagged gaia.hub:latest -
Run your Gaia hub image.
docker run --restart=always -v ~/gaia/hub/config.json:/src/hub/config.json -p 3000:3000 -e CONFIG_PATH=/src/hub/config.json gaia.hubThis runs your Gaia hub on port
3000. If everything runs successfully, the last line outputted from this command should be:Successfully compiled 13 files with Babel. {"level":"warn","message":"Listening on port 3000 in development mode","timestamp":"2019-01-23T16:35:05.216Z"} -
If your command did run successfully, stop the service using the hotkey
ctrl-c. -
Run the the image again with this new command.
docker run --restart=always -v ~/gaia/hub/config.json:/src/hub/config.json -p 3000:3000 -e CONFIG_PATH=/src/hub/config.json -d gaia.hubThis command includes
-doption todocker run. This runs Docker in detached mode, so that it runs in the background. You can rundocker psto see your running docker images, and get theidof your Gaia server.root@meepers:~/gaia/hub# docker ps CONTAINER ID IMAGE COMMAND CREATED STATUS PORTS NAMES aeca7eea4a86 gaia.hub "npm run start" 11 seconds ago Up 10 seconds 0.0.0.0:3000->3000/tcp musing_payne
At this point, your Gaia service is up and running. You can run docker logs MY_CONTAINER_ID with your running image’s ID to see the logs of this server at any time.
Task 8: Set up an Nginx reverse proxy
In this task, you set up a simple Nginx reverse proxy to serve your Docker container through a public URL. You do this from the droplet console command line.
-
Install nginx into the droplet.
sudo apt-get install nginx - Enter
yto confirm the installation. -
Edit the nginx default configuration file.
vi /etc/nginx/sites-available/default -
Inside the
location /block (line 48), enter the following configuration:location / { proxy_pass http://localhost:3000; proxy_http_version 1.1; proxy_set_header Upgrade $http_upgrade; proxy_set_header Connection 'upgrade'; proxy_set_header Host $host; proxy_cache_bypass $http_upgrade; if ($request_method = 'OPTIONS') { more_set_headers 'Access-Control-Allow-Origin: *'; more_set_headers 'Access-Control-Allow-Methods: POST, OPTIONS, DELETE'; more_set_headers 'Access-Control-Allow-Headers: Origin, X-Requested-With, Content-Type, authorization'; more_set_headers 'Access-Control-Max-Age: 21600'; more_set_headers 'Content-Type: text/plain charset=UTF-8'; more_set_headers 'Content-Length: 0'; return 204; } more_set_headers 'Access-Control-Allow-Origin: *'; }This simple configuration passes all requests through to your Gaia hub running at port
3000. - Save and close the file.
-
Run
nginx -tto make sure you have no syntax errors.root@meepers:~/gaia/hub# nginx -t nginx: the configuration file /etc/nginx/nginx.conf syntax is ok nginx: configuration file /etc/nginx/nginx.conf test is successful -
Restart
nginxwith your new configuration.systemctl restart nginx -
Allow access to your Gaia hub by exposing port 80 to the public.
ufw allow 80
Task 9: Test your Gaia server
Now, you are ready to test your Gaia server and make sure it is up and running.
- Click on Droplets in the sidebar.
-
Find your Droplet running Gaia.
- Copy the IP address for it.
-
In your browser, visit the page
MY_DROPLET_IP/hub_info.You should see a response from your Gaia hub!
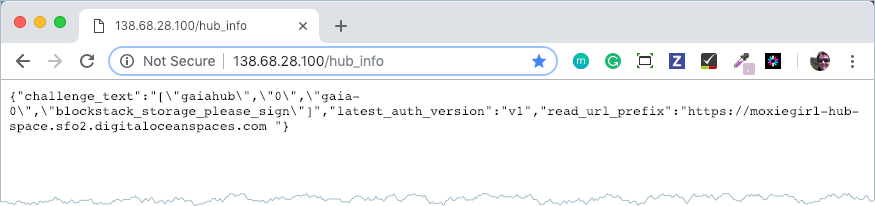
The
read_url_prefixshould be combine from the bucket and endpoint create in yourconfig.jsonfile, for example,https://meepers-hub-space.s3.amazonaws.com/.
Task 10: Configure a domain name
At this point, you can point a domain to your Gaia hub. Although it’s not required, it is highly recommended. If you use a domain, you can migrate your Droplet to a different server (or even provider such as Azure or AWS) at any time, and still access it through the domain URL. Simply point your domain at the IP address for your Droplet. Use an A Record DNS type.
These instructions assume you have already created a free domain through the freenom service. To point this freenom domain to your Gaia hub, do the following:
- Log into your freenom account.
- Choose the Manage Freenom Domain tab.
-
Add an A record leave the Name field blank.
This record points your entire domain to the hub IP.
-
Save your changes.
-
Create a CNAME record.
For example, you can use the prefix
wwwwith your domain name. When you are done, your -
Save your changes.
At this point, your DNS management should look similar to the following except that with your domain rather than the
maryhub.gadomain.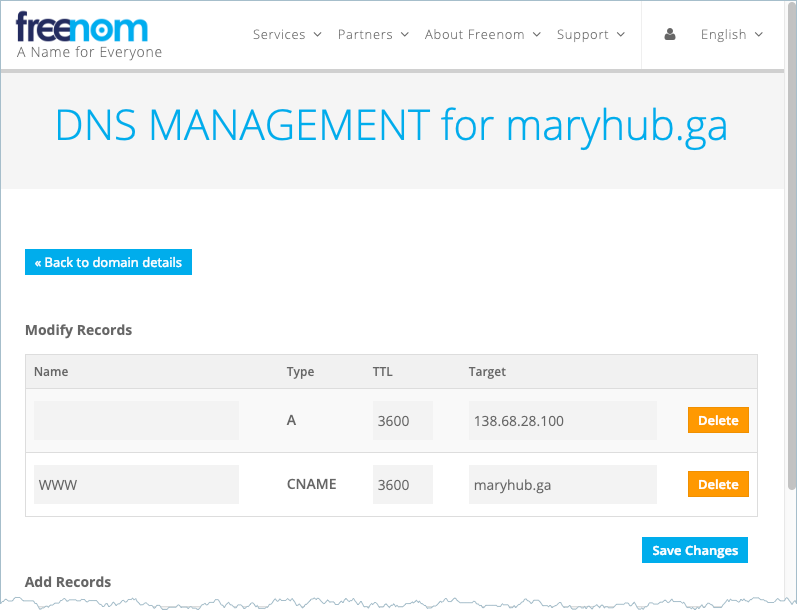
-
After your changes propagate, visit your new domain at the
hub_infopage.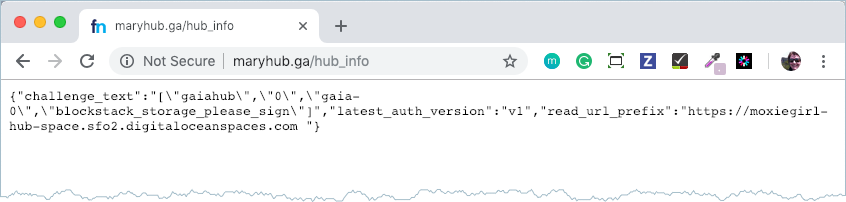
Task 11: Set up SSL
If you’ve configured a domain to point to your Gaia hub, then it’s highly
recommended that you set up SSL to connect to your hub securely. DigitalOcean
provides how to setup SSL . Follow those instructions, to setup SSL.
When completed, you’ll be able to visit https://mygaiadomain.com/hub_info
securely.